|
To do this as easily as possible we will configure the router first. This is because configuring the PC's network settings first would prevent us from using the ethernet connection to configure the router.
Complete the following steps in sequence to configure the router :
- Start the PC and load Windows.
- Open the Start menu and go to RUN, then in the 'Open' box type 'cmd' (without quotes).
- At the command prompt that opens, type 'ipconfig' and press enter.
- There should be a Default Gateway and IP address displayed, sometimes referred to as an IPV4 address. Both of these should be present and should be similar (like 192.168.2.1 and 192.168.2.4). If these are not present or are invalid (aren't similar) try connecting the CAT5 cable to a different LAN port on the router, then disconnect and reconnect power to the router. Repeat the 'ipconfig' command and you should now see 2 valid IP's.
- Enter the IP address of the 'Default Gateway' into your the address bar in Internet Explorer and hit 'Enter'.
- This should bring you to the router-configuration screen. You will likely be prompted for a username & password - use the defaults for your router. A Common default username/password is admin/admin or admin without a password. If you do not know the default password, google the model of your router and you will find it.
- Most settings can be configured however you like but you have to specify the IP settings manually. These are commonly referred to as the LAN and WAN settings and are available somewhere in your router configuration screen. Look for any configuration menu labeled 'Internet Connection', 'Network Setup', 'LAN Settings', 'WAN Settings', 'Router Settings', or something similar to find the necessary screens.
- On the Internet / WAN configuration screen, select 'Static IP' as the connection type and enter the following information into the corresponding fields :
- IP Address : 192.168.9.2
- Subnet Mask : 255.255.255.0
- Gateway Address : 192.168.9.1
- Primary DNS Address : 192.168.9.1
- Secondary DNS Address : 192.168.9.1
- Click 'Save' to apply the settings, the router may restart.
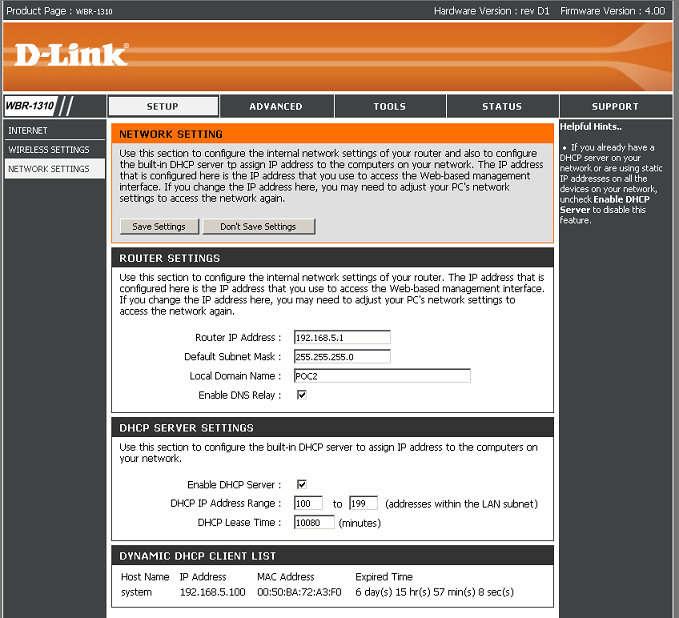
- On the Network / LAN configuration screen, enter the following information to the corresponding fields:
- Router IP Address : 192.168.5.1
- Default Subnet Mask : 255.255.255.0
Also, make sure 'DHCP' is enabled
- Click 'Save' to apply the settings, again, the router may restart.
WAN Settings
|
LAN Settings
|
In the above instructions, we specified to use 192.168.5.* as the IP scheme for the LAN / network. This could really be any 192.168.*.* scheme as long as it does not interfere with other IP's on the network. We recommend using 192.168.5.1 as it isn't used by default.
Likewise, the Internet / WAN IP settings use the 192.168.9.* scheme however this should not be changed as it must match what is provided by the PC. If you have to change this from a 192.168.9.* scheme then you must change it in the PC's network settings as well.
For inexperienced POC users we recommend using the above numbers exactly as they should work in almost any situation.
If you plan to secure your wireless network you can configure your wireless settings such as the SSID (broadcast name) and encryption (password) now.
It's also a good idea to set a password on the router (likely in the 'Administration' section) and enable 'Remote Administration' so that you can access and configure you're router later without having to change any network settings or switch cables.
If you have enabled Remote Adminsitration and would like to access your router setup after your POC is finished you can do so by going to http://192.168.9.1 or http://192.168.9.1:8080 in any web-browser on your POC.
Now that the router is configured to receive a connection from the PC - you have to configure the PC to share it's connection with the router.
Complete the following steps in sequence to configure the PC's Network connections :
- Open the 'Control Panel' from the start menu.
- Open 'Network Connections'.
- Right-click on the wireless connection and select 'Properties'.
- Click on the 'Advanced' tab.
- In the Internet Connection Sharing section, check the 'Allow other network users to connect through this computers internet connection'.
- Click 'OK'. You may receive a prompt informing you to disable static IP's - Click 'Yes'.
- Right-click on 'Local area connection' and select 'Properties'.
- Select 'Internet Protocol (TCP/IP)' from the menu and click 'Properties'.
- Select 'Use the following IP address'.
- In the 'IP Address' field, enter : '192.168.9.1' .
- In the 'Subnet mask' field, enter : '255.255.255.0' .
- Leave the 'Default gateway' field empty.
- Leave the Preferred and Alternate DNS Server fields empty.
- Click 'OK' in both windows.
After completing the above steps, the PC should now be configured to share it's wireless connection with the router via it's ethernet adapter.
The router is also configured to use a static IP address to receive it's connection and awaiting connection via the WAN port.
This means that any network connections established using the wireless adapter will now be shared with the router and re-broadcast as a private sub-network.
With this configuration you can jump from one wireless connection to another and it will automatically share the current connection with your sub-network.
If you wanted to share a wired connection it would require 2 installed ethernet ports but you would simply select to share the second wired connection instead of the wireless connection.
In the event that you use a VPN service like OpenVPN then you would select to share the 'Virtual Connection' that is created when OpenVPN is installed. This should appear as a TAP - Win32 adapter.
See the next section titled Final Configuration for the final steps in creating your POC.
|